Create-a-Free-Blog – Part 2
Thanks for joining us! Grab a drink – today we’re going to get hands-on and generate your blog locally using Hugo, a fast and modern static site generator. This means your blog won’t be live on the internet just yet – we’ll get there in Part 3.
We’ll install Hugo, pick a theme, create your first post, and preview your blog in your browser.
If you missed the first post, see Part 1: Create a Clean Zero-Ad Blog for Free.
What You’ll Need
- A computer with a stable internet connection (Windows, macOS, or Linux)
- A terminal or command line tool (pre-installed on all operating systems)
- A code editor – we recommend Visual Studio Code, and if you don’t have this already, we’ll show you how to install it.
What is Hugo?
Hugo is a free, open-source static site generator written in Go. It turns plain text files written in Markdown into a complete, fast-loading blog or website. Unlike platforms like WordPress, Hugo creates static files (called HTML, CSS and JavaScript(JS)) that are easy to host and maintain.
HTML, CSS and JS are the three foundational languages used to create websites.
Hugo makes creating a blog easy by generating most of the above files for you. You only really need to worry about creating posts (more to come on that) – however, you can customize your blog using these languages as much as you’re comfortable with. We won’t be touching on them much in these tutorials.
Benefits of using Hugo:
- Super fast page loads
- No databases to manage
- Perfect for learners, writers, or developers
- Completely free and ad-free
Installing Hugo and Git
We’ll guide you through installing Hugo for Windows, macOS, and Linux. You’ll also need Git, which is required to install themes.
Windows Setup
-
Open PowerShell as Administrator
- Right-click PowerShell and choose Run as Administrator
-
Install Scoop (a package manager)
- First you must install a package manager. I recommend Scoop, an open-source package manager.
- In Powershell, enter the following code and press Enter.
Set-ExecutionPolicy RemoteSigned -Scope CurrentUser irm get.scoop.sh | iex- When prompted, type Y and press Enter.
-
Install Hugo Extended
- Next run the following:
scoop install hugo-extended -
Verify Installation
- Hugo should now be installed. To verify the installation, type the following:
hugo version- You should see this output:
hugo v0.xx.x-XXXXXXX+extended windows/amd64 -
Install Git
- Download Git from git-scm.com/download/win and run the installer – Git is what lets you use Hugo themes for your website.
macOS Setup
-
Install Homebrew (if you don’t have it)
- First you must install a package manager. Homebrew is the most common package manager on macOS. If you don’t have it installed already, first, open your terminal and paste the following command:
/bin/bash -c "$(curl -fsSL https://raw.githubusercontent.com/Homebrew/install/HEAD/install.sh)" -
Install Hugo and Git
- In your terminal, run the following to install both Hugo and Git at once. Git is what allows you to install Hugo themes for your site.
brew install hugo git -
Check Hugo Version
- Hugo and Git should now be installed. To verify the Hugo installation, type the following:
hugo version- You should see this output:
hugo v0.xx.x+extended darwin/arm64 (or amd64)
Linux (Linux Mint 22.1 example)
Commands may vary depending on your distribution. We here at LearnTechCafe use Linux Mint 22.1.
-
Download the latest Hugo Extended release
- Visit the Hugo Releases Page
- Download the latest extended version of the following file to your
Downloadsfolder:hugo_extended_0.xx.x_Linux-64bit.tar.gz
-
Extract and Install
- Extract the file from your
Downloadsfolder and install Hugo by running the following:
cd ~/Downloads tar -xzf hugo_extended_0.xx.x_Linux-64bit.tar.gz sudo mv hugo /usr/local/bin/ sudo chmod +x /usr/local/bin/hugo - Extract the file from your
-
Verify Installation
- Hugo should now be installed. To verify the installation, type the following:
hugo version- You should see this output:
hugo v0.xx.x+extended linux/amd64 -
Install Git
- Now install Git by running the following. Git is what lets you install themes in your Hugo website.
sudo apt install git
Install Visual Studio Code
From here on out, the same instructions apply to all operating systems.
If you don’t already have a code editor, download and install Visual Studio Code (VS Code). It’s lightweight, beginner-friendly, and works across all major platforms.
Create Your Hugo Site
Now that Hugo is installed, let’s create your blog!
-
Open your terminal and run:
hugo new site myblog --format yamlYou can replace
myblogwith any name you like – typically, the name of your blog (no spaces). In this tutorial, we will continue to use the namemyblog. The--format yamlportion is optional. It changes the default configuration file from hugo.toml to hugo.yaml, which is generally easier to read. In the terminal, you should see something like the following: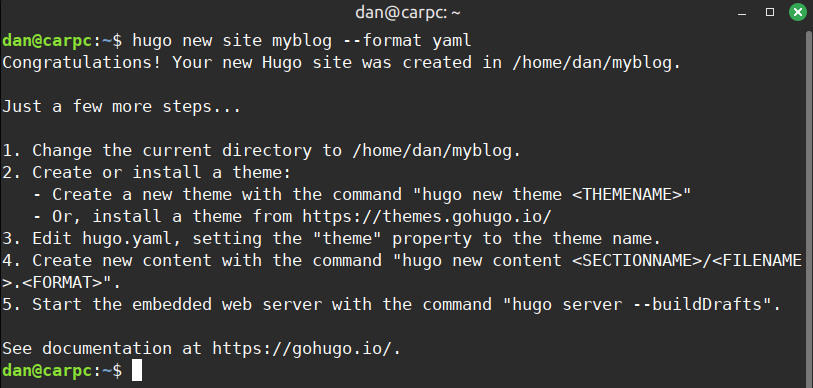
Tip: Note the second line which says
Your New Hugo site was created in.... Remember this folder location – this is where your new site folder is stored. -
Navigate to your new folder and explore the structure. This is the root folder and contains the structure of your entire blog – it’s where you’ll store your theme, content, images, etc. You’ll see folders like
content,themes, and the configuration file,hugo.yaml. You can optionally move your root folder to another location, just do not remove the content within it.The folder structure should look like the following:
myblog/
├── archetypes
│   └── default.md
├── assets
├── content
├── data
├── hugo.yaml
├── i18n
├── layouts
├── static
└── themes
Pick and Install a Hugo Theme
Now for the fun part – choosing a theme for your blog! Hugo offers dozens of free themes maintained by open-source developers.
- Browse Hugo themes and explore designs.
- We recommend PaperMod – it’s a solid option for a clean, modern blog, and is what LearnTechCafe uses. This is what we’ll be using for this tutorial.
To Install PaperMod:
Note: similar instructions apply to all Hugo themes. Just go to Hugo themes, click the theme you want, and look for a link to that theme’s GitHub Repository (Repo).
- Visit the PaperMod GitHub Repo
- Click the green <> Code button and select Download ZIP
- Unzip the file
- Copy the entire unzipped folder into your Hugo site’s
themesdirectory It will be called something likehugo-PaperMod-master. Rename this folder to exactlyPaperMod(capitalization matters).
In your root folder should now see:
myblog
├── archetypes
│   └── default.md
├── assets
├── content
├── data
├── hugo.yaml
├── i18n
├── layouts
├── static
└── themes
    └── PaperMod
Edit Configuration File to Recognize Theme
You’re almost ready to write your first post! All that’s left is to make sure your configuration file points to your theme.
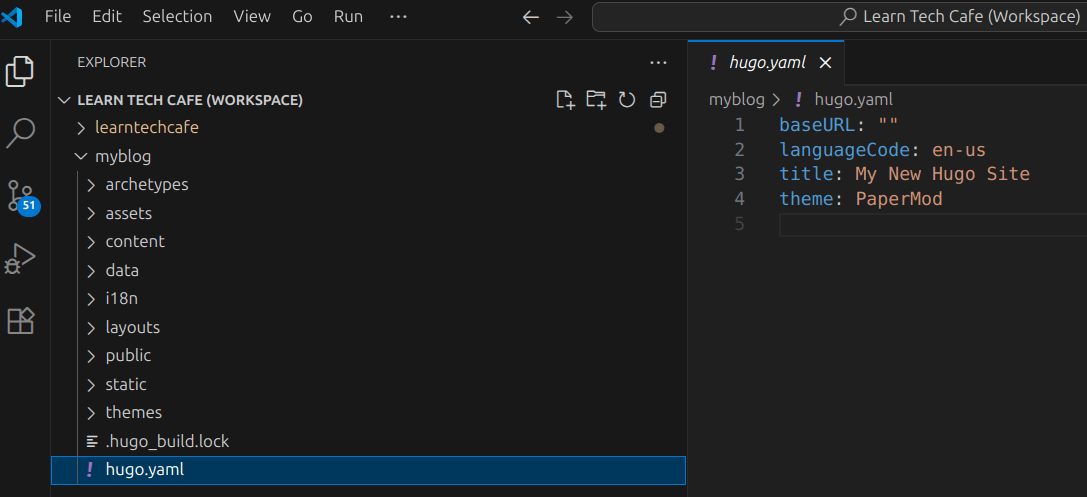
- Open VS Code, then drag your root folder into the Explorer pane (see image below for an
example of what it should look like). This will let you see your entire blog folder in
VS Code. Open up the configuration file,
hugo.yaml. - I recommend editing the
baseURLto be"". We’ll come back to this in Part 3.
- Finally, type a new parameter called
themeand set the value toPaperMod. This tells Hugo which theme to use. If you don’t do this, you won’t be able to run or view your site. Save.
Create Your First Post
Time to write a basic post to see your blog in action. Back in the terminal, generate a new post file by running:
hugo new posts/my-first-post.md
This creates a draft post in content/posts/my-first-post.md. The posts folder will contain all your posts – you can always add subfolders to break up your post structure as you get more comfortable with Hugo.
Locate and open your first post file in VS Code and:
- Change
draft: truetodraft: false.
draft: true. This value must be changed todraft: falsein order to be published live.
- The front matter is the information that is pre-populated at the top of the file, between the two
---lines. Add some test content under the front matter. Just a sentence or two will do for now.
Run Your Blog Locally
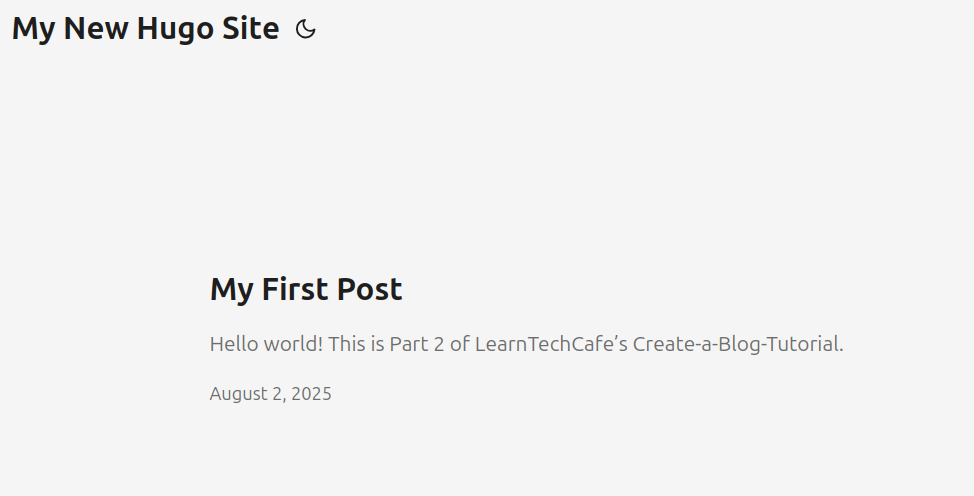
Now let’s see your blog! To preview your site run:
hugo server
Open your browser and visit: http://localhost:1313. You should see your blog running locally on your computer! Try clicking on the post to open it up in a new page. You’ll also see a niftly toggle button near the top of the page which switchs your site between light and dark mode.

CTRL + Ctwice to stop while keeping the terminal open.
Recap
You just:
- Installed Hugo and Git
- Created your blog site folder
- Installed a theme
- Created your first post
- Ran the blog locally in your browser
Nice work! From now on, you can preview your content and changes live in your browser. Play around with updating some content in your post.
Coming Up Next
In Part 3 of our Create-a-Free-Blog Tutorial, we’ll walk you through how to publish your blog live using GitHub and Netlify. We’ll get into using Markdown to write and customize you posts in Part 4.
This blog is still super-new, so we don’t have an email list (yet). But we’d love your feedback!
💬 Send us a message – let us know what you’d like to see next.
Coming soon: Markdown cheat sheet + Hugo command quick guide!